ASYNergy Form Validation
This tutorial shows how to validate form data and provide real-time feedback to the user without reloading the page using ASYNergy, a JavaScript framework for network requests and changes on the page.
- Introduction
- The Stylesheet
- The Table
- Controller
- The asynRegister Handler
- The Index Handler
- The email Handler
- The password Handler
- The passwordConfirm Handler
- The signup Handler
- The success Handler
- The emailCheck Handler
- Validation Rules
- Model
- View
- Conclusion
Introduction
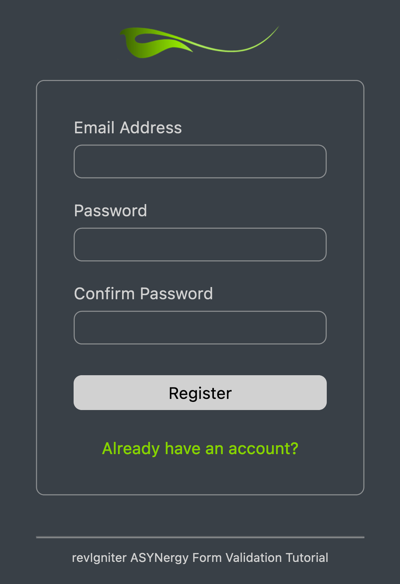
The page consists of a registration form where you enter an email address, password, and a password confirmation.
When the email input field loses focus while filling out the form, ASYNergy sends an AJAX request to ensure that the entered string is a valid email address and that the address is not already stored in the database. If something is wrong, an error message will be displayed right below the email input field.
While typing in the password field, ASYNergy sends AJAX requests to check if the length of the entered string is between 8 and 24 characters. If this requirement is not met, an error message will be displayed right below the password input field.
When typing in the password confirmation input field, ASYNergy sends AJAX requests to check if the two password strings match. As long as this requirement is not met, an error message will be displayed right below the password confirmation input field.
To set up this form, we need the following files and a database table:
- a controller named "asynRegister.lc", the file that will be associated with the URI.
- five views, respectively page fragments, named "registerMainView.lc", "registerHeaderView.lc", "registerView.lc", "registerFooterView.lc", and "registerSuccessView.lc". Of course, two view files, one representing the Registration page and one representing the Success page, would do, but this is to demonstrate how multiple views are assembled, and as a side-effect, we avoid redundant HTML code.
- a model named "asynregistermodel.livecodescript", the file that deals with information in your database.
- a table in your database named "users" to store the email addresses and passwords of the users. We use SQLite here as the database platform.
If you have not read about controllers, views, and models in the User Guide, you should do so before continuing.
Note: Before we begin, save the following stylesheet in assets/css/asynReg.css, build the table using the table structure below, and store the SQLite file in application/db/. If you like, you can use the tutorials.sqlite database located in the application/db folder.
The Stylesheet
*,
*::before,
*::after {
  box-sizing: border-box;
}

html {
  line-height: 1.15;
  -webkit-text-size-adjust: 100%;
}

body {
  margin: 0;
}

body {
  color: rgb(199, 199, 199);
  font-family:
    system-ui,
    -apple-system,
    'Segoe UI',
    Roboto,
    Helvetica,
    Arial,
    sans-serif,
    'Apple Color Emoji',
    'Segoe UI Emoji';
  font-size: 16px;
}

hr {
  height: 0;
  color: inherit;
}

b,
strong {
  font-weight: bolder;
}

button,
input,
optgroup,
select,
textarea {
  font-family: inherit;
  font-size: 100%;
  line-height: 1.15;
  margin: 0;
}

::-moz-focus-inner {
  border-style: none;
  padding: 0;
}

:-moz-focusring {
  outline: 1px dotted ButtonText;
}

body {
  padding-left: 20px;
  padding-right: 20px;
}

body,
input[type=text],
input[type=password] {
  background-color: rgb(43, 49, 55);
}

a:hover {
  text-decoration: underline;
}

.container {
  align-items: center;
  display: flex;
  flex-direction: column;
}

#logo {
  display: block;
  width: 162px;
  margin-bottom: 20px;
  margin-top: 20px;
}

.main,
section a {
  display: flex;
}

.main {
  flex-direction: column;
  padding: 36px;
}

form {
  margin-bottom: 8px;
}

section a {
  align-self: center;
  color: rgb(118, 205, 0);
}

input[type=text], input[type=password] {
  color: rgb(255, 255, 255);
  padding: 6px;
}

input[type=text],
input[type=password],
input[type=submit] {
  margin: 8px 0 20px;
  width: 100%;
}

input[type=submit] {
  background-color: rgb(199, 199, 199);
  border: none;
  cursor: pointer;
  padding: 8px;
}

input[type=submit]:hover {
  background-color: rgb(118, 205, 0);
  transition: background-color 0.8s;
}

section,
input[type=submit],
input[type=text],
input[type=password] {
  border-radius: 8px;
}

section a,
input[type=submit] {
  text-decoration: none;
}

section,
input[type=text],
input[type=password] {
  border: 1px solid rgb(199, 199, 199, 0.5);
}

#footer {
  font-size: .75em;
  text-align: center;
}

hr {
  color: rgba(199, 199, 199, 0.5);
  margin: 40px 15px 0 15px;
}

.errorMessage {
  color: rgb(250, 80, 80);
  font-size: .75em;
  margin-top: -10px;
}

@media only screen and (min-width: 420px) {
  .main {
    width: 400px;
  }
}
The Table (SQLite)
CREATE TABLE "users" (
  "id" INTEGER NOT NULL,
  "email" TEXT NOT NULL,
  "password" TEXT NOT NULL,
  PRIMARY KEY ("id")
);
Controller
The controller consists of two handlers commonly used in controllers and six additional ones. The first handler, asynRegister, is named after the file itself and is called before any other handler. It loads all required libraries and helpers, plus models and the database if needed. The second handler, named index, is the default handler, which is mandatory. This handler is called automatically if no other handler is specified in the URI.
Further, we need a handler that checks if the string entered into the email input field is a valid email address, a handler that validates the password entered, one that validates the confirmation password, a handler that is called by clicking on the "Register" button, and finally a "success" handler that loads the page confirming that the registration was successful.
We start with the basic prototype for a controller script:
<?lc

# PUT YOUR HANDLER NAMES  INTO THE GLOBAL gControllerHandlers AS A COMMA SEPARATED LIST
put "asynRegister,index" into gControllerHandlers


# THE CONTROLLER HANDLER
command asynRegister
  # LOAD REQUIRED LIBRAIES, MODELS, HELPERS
end asynRegister

# THE DEFAULT HANDLER
command index
  -- do something here
end index


--| END OF asynRegister.lc
--| Location: ./application/controllers/asynRegister.lc
----------------------------------------------------------------------
Save this script as "asynRegister.lc" in application/controllers. This controller is associated with a URI like this: example.com/index.lc/asynRegister/ or, if you use a .htaccess file with appropriate mod_rewrite rules: example.com/asynRegister/ (see revIgniter URLs).
The asynRegister Handler
The controller handler asynRegister is called first. So, this is a good place to load required helpers, libraries, models, and the database.
Actually, we would need to load the Asset helper to generate JavaScript and CSS location html code, but this helper is automatically loaded by the ASYNergy library to get the required ASYNergy JavaScript code, which is then stored in gData["asynergyScript"]. The Form helper needed to generate the form action markup is loaded by the Formvalidation library. So there is only one helper left to be loaded. The URL helper, which is used to generate a link.
rigLoadHelper "url"
Since we don't want page redraws while the user fills out the form and the input is validated, we use AJAX requests with the help of ASYNergy and therefore we load the ASYNergy library. Also, of course, we need the Formvalidation library and the Encryption library to encrypt the passwords:
put "ASYNergy,Formvalidation,Encrypt" into tLibs
rigLoaderLoadLibrary tLibs
Now load the database. Note: If the function does not contain any information in the first parameter, it will connect to the connection group specified in your database config file. For most people, this is the preferred method of use. Make sure that all these settings are correct, that gRigA["activeRecord"] is set to TRUE, and that your database contains the "users" table. Add the following line to the asynRegister handler:
get rigLoadDatabase()
So far we have not built the model, but we include it here anyway and write the corresponding code afterwards:
rigLoadModel "asynregistermodel"
Finally, we call the rigAnchor() function to generate a link used on the success page that points back to the registration page. We save this link in the global variable gData. If, in the view, enclosed in double square brackets, like [[gData["againAnchor"]]], the values of this array will be automatically merged with the view:
put rigAnchor("asynRegister", "Try it again!") into gData["againAnchor"]
Your asynRegister handler should now look like this:
command asynRegister
  local tLibs

  # HELPERS NEEDED, THE ASSET HELPER IS
  # LOADED BY THE ASYNERGY LIBRARY, THE
  # FORM HELPER IS LOADED BY THE
  # FORMVALIDATION LIBRARY
  rigLoadHelper "url"

  # LIBRARIES NEEDED
  put "ASYNergy,Formvalidation,Encrypt" into tLibs
  rigLoaderLoadLibrary tLibs
  # DATABASE
  get rigLoadDatabase("asynRegister")
  # MODEL
  rigLoadModel "asynregistermodel"

  # LINK ON THE SUCCESS PAGE THAT POINTS BACK TO THE REGISTRATION PAGE
  put rigAnchor("asynRegister", "Try it again!") into gData["againAnchor"]
end asynRegister
The Index Handler
If no handler is specified in the URI, the default handler index is called. This is the handler, which does all the work when the page is loaded the first time. First, we save the page title in the global variable gData.
put "Asynergy Registration" into gData["pageTitle"]
Then we add code that generates the markup for the logo:
put "logo" into tLogo["id"]
put "Logo" into tLogo["alt"]
put "162" into tLogo["width"]
put "38" into tLogo["height"]
put rigImageAsset("logo.png", tLogo, , TRUE) into gData["logo"]
Note: The fourth parameter of the rigImageAsset() function determines if asset file names should include the timestamp of last modification. Setting this parameter to true avoids issues with browser cached data whenever you modify static files like images, CSS files, JavaScript files, or favicons without changing the file name.
Now let's add code that creates the form's action markup including an ASYNergy HTML attribute asyn:submit.prevent whose value, in this case "signup", is set to the name of the controller handler to be called when the user clicks onto the submit button. Adding this attribute to the form tells ASYNergy to process it before submission. So, this prevents the normal submit action when the user submits the form.
put "signup" into tFormAttrA["asyn:submit.prevent"]
put rigFormOpen("asynRegister", tFormAttrA) into gData["formOpen"]
This will generate a HTML markup like:
<form action="https://example.com/asynRegister" method="post" accept-charset="utf-8" asyn:submit.prevent="signup">
or, in case you enabled CSRF protection:
<form action="https://example.com/asynRegister" method="post" accept-charset="utf-8" asyn:submit.prevent="signup">
<input type="hidden" name="csrfTokenName" value="bb8e156c-9aa5-42be-b573-dc0b533ca3da" asyn:csrf="csrfTokenName" />
Then we add code that generates the submit button markup:
put rigSubmitButton("register", "Register") into gData["submit"]
In case a user has JavaScript disabled for some reason so that ASYNergy cannot be loaded, we set up the default form validation mechanism within the index handler. This requires the generation of error messages and the storage of input data for re-populating the form in case the data entered was incorrect. If the entered data is correct, we store it in the database and load the "success" page, otherwise we reload the registration page and display the corresponding error messages.
There is a small but crucial difference to normal form validation, namely we add asyn:mutable attributes to the markup of error messages. These "directives" are used by ASYNergy to display the error messages without reloading the whole page.
Following the code for form validation as described:
# VALIDATE FORM DATA AND GENERATE ERROR MESSAGES
# NO NEED TO SPECIFY THE RULE GROUP WITH THE FIRST PARAMETER
# OF THE rigFormValidRun() FUNCTION BECAUSE IT IS AUTOMATICALLY
# SET TO THE CONTROLLER NAME WHICH IS THE NAME OF THE
# APPROPRIATE RULE GROUP SET IN config/validation.lc
if rigFormValidRun() is FALSE then
  # GET VALIDATION ERRORS
  put rigFormError("email", "<p class=" & quote & "errorMessage" & quote && \
    "asyn:mutable=" & quote & "email" & quote & ">", "</p>") into gData["emailError"]

  put rigFormError("password", "<p class=" & quote & "errorMessage" & quote && \
    "asyn:mutable=" & quote & "password" & quote & ">", "</p>") into gData["pwError"]

  put rigFormError("passwordConfirm", "<p class=" & quote & "errorMessage" & quote && \
    "asyn:mutable=" & quote & "passwordConfirm" & quote & ">", "</p>") into gData["pwConfError"]

  # IF VALIDATION FAILES RE-POPULATE THE FORM
  # AND LOAD PAGE AGAIN
  put rigSetValue("email") into gData["email"]
  put rigSetValue("password") into gData["password"]
  put rigSetValue("passwordConfirm") into gData["passwordConfirm"]

  get rigLoadView("registerMainView")
else
  # OTHERWISE ADD NEW DATA TO THE DATABASE
  # AND LOAD THE SUCCESS PAGE
  put rigVarPOST("email") into tEmail
  put rigVarPOST("password") into tPassword
  put rigEncode(tPassword, "myKey") into tEncPW

  if tEncPW <> FALSE then
    insertUser tEmail, tEncPW
    get rigLoadView("registerSuccessView")
  else
    get rigLoadView("registerMainView")
  end if

end if
The insertUser handler inserts the email address and the password of new users into the database. This handler needs to be implemented in the model later.
Your index handler should now look like this:
command index
  local tLogo, tFormAttrA, tEmail, tPassword, tEncPW

  # SET PAGE TITLE
  put "Asynergy Registration" into gData["pageTitle"]

  # GENERATE LOGO MARKUP, NO NEED TO LOAD THE ASSET HELPER
  # IT IS LOADED BY THE ASYNERGY HELPER
  put "logo" into tLogo["id"]
  put "Logo" into tLogo["alt"]
  put "162" into tLogo["width"]
  put "38" into tLogo["height"]
  put rigImageAsset("logo.png", tLogo, , TRUE) into gData["logo"]


  # GENERATE FORM OPEN AND SUBMIT BUTTON MARKUP
  put "signup" into tFormAttrA["asyn:submit.prevent"]
  put rigFormOpen("asynRegister", tFormAttrA) into gData["formOpen"]
  put rigSubmitButton("register", "Register") into gData["submit"]


  # VALIDATE FORM DATA AND GENERATE ERROR MESSAGES.
  # NO NEED TO SPECIFY THE RULE GROUP WITH THE FIRST PARAMETER
  # OF THE rigFormValidRun() FUNCTION BECAUSE IT IS AUTOMATICALLY
  # SET TO THE CONTROLLER NAME WHICH IS THE NAME OF THE
  # APPROPRIATE RULE GROUP SET IN config/validation.lc
  if rigFormValidRun() is FALSE then
    # GET VALIDATION ERRORS
    put rigFormError("email", "<p class=" & quote & "errorMessage" & quote && \
      "asyn:mutable=" & quote & "email" & quote & ">", "</p>") into gData["emailError"]

    put rigFormError("password", "<p class=" & quote & "errorMessage" & quote && \
      "asyn:mutable=" & quote & "password" & quote & ">", "</p>") into gData["pwError"]

    put rigFormError("passwordConfirm", "<p class=" & quote & "errorMessage" & quote && \
      "asyn:mutable=" & quote & "passwordConfirm" & quote & ">", "</p>") into gData["pwConfError"]

    # IF VALIDATION FAILES RE-POPULATE THE FORM
    # AND LOAD PAGE AGAIN
    put rigSetValue("email") into gData["email"]
    put rigSetValue("password") into gData["password"]
    put rigSetValue("passwordConfirm") into gData["passwordConfirm"]

    get rigLoadView("registerMainView")
  else
    # OTHERWISE ADD NEW DATA TO THE DATABASE
    # AND LOAD THE SUCCESS PAGE
    put rigVarPOST("email") into tEmail
    put rigVarPOST("password") into tPassword
    put rigEncode(tPassword, "myKey") into tEncPW

    if tEncPW <> FALSE then
      insertUser tEmail, tEncPW
      get rigLoadView("registerSuccessView")
    else
      get rigLoadView("registerMainView")
    end if

  end if
end index
The email Handler
Now we need handlers that validate user input and are called by ASYNergy while the user is filling out the form.
Add the following handler, which checks whether the validation rules for entering an email address are met, to the controller script. We will implement validation rules later.
# DON'T FORGET TO ADD THE NAMES OF THE HANDLERS BELOW
# TO THE LIST IN THE gControllerHandlers VARIABLE
# AT THE TOP OF THE CONTROLLER SCRIPT.
command email
  local tError

  put rigAsynValidateInput("email") into tError
  rigAsynRespond tError
end email
The rigAsynValidateInput() function included in the ASYNergy library validates input data using the form validation library. The first parameter of this function is the value of the asyn:model attribute of the email input element passed by ASYNergy. The AJAX request sent by ASYNergy also contains the value of the email form field, which is validated according to the rules we will define later.
If the validation fails, an error message will be added to the response which is sent by the rigAsynRespond handler. This message replaces the current HTML enclosed by the tags of a "mutable" element whose asyn:mutable attribute has the value "email".
Note: Don't forget to add the handler name "email" to the global variable gControllerHandlers at the top of the controller script.
The password Handler
The next handler to add to the controller script is called by ASYNergy when the user writes in the password form field.
command password
  local tTransmitted, tTransmittedA, tError

  put rigAsynElemData("passwordConfirm") into tTransmitted

  # ONLY COMPARE THE 2 PASSWORD ENTRIES IF THE PASSWORD
  # CONFIRMATION FIELD IS NOT EMPTY
  if tTransmitted <> empty then
    put tTransmitted into tTransmittedA["passwordConfirm"]
  end if
  put rigAsynValidateInput("password", tTransmittedA) into tError

  rigAsynRespond tError
end password
The password is validated, and if the password confirmation field is not empty, it is checked whether the entered password matches the password confirmation. The handler has access to the value of the password confirmation form field calling rigAsynElemData("passwordConfirm").
Note: Add the handler name "password" to the global variable gControllerHandlers at the top of the controller script.
The passwordConfirm Handler
The next handler is called when the user writes in the password confirmation form field. The rigAsynValidateInput("password,passwordConfirm") function uses the form validation library to validate two form fields and checks if the entered password matches the password confirmation.
Add the following code to the controller script:
command passwordConfirm
  local tError

  put rigAsynValidateInput("password,passwordConfirm") into tError

  rigAsynRespond tError
end passwordConfirm
Note: Add the handler name "passwordConfirm" to the global variable gControllerHandlers.
The signup Handler
"signup" is the value of the asyn:submit.prevent attribute of the form element. This means that when the user clicks on the submit button, ASYNergy calls the signup handler of the controller:
command signup
  local tErrorA, tEmail, tPassword, tEncPW, tSegments

  put rigAsynValidateInput("email,password,passwordConfirm") into tErrorA

  if tErrorA is empty then
    put  rigAsynElemData("email") into tEmail
    put  rigAsynElemData("password") into tPassword
    put rigEncode(tPassword, "myKey") into tEncPW

    if tEncPW <> FALSE then
      insertUser tEmail, tEncPW

      # DISPLAY SUCCESS PAGE
      put "asynRegister/success" into tSegments
      rigAsynNavigate tSegments
    else
      # RELOAD THE REGISTRATION PAGE
      put "asynRegister" into tSegments
      rigAsynNavigate tSegments
    end if

  else
    rigAsynRespond tErrorA
  end if -- if tErrorA is empty
end signup
The rigAsynValidateInput("email,password,passwordConfirm") function validates all three input form fields at once and returns an array of error messages if validation fails. If there are no errors, the signup handler stores the email address and the encrypted password in the database and loads the "success" page using the rigAsynNavigate handler of the ASYNergy library; otherwise, it sends a response to the client including the corresponding error messages.
Of course, later we need to make sure that the model contains an insertUser handler.
Note: Add the handler name "signup" to the global variable gControllerHandlers.
The success Handler
The following handler will be called by the signup handler if form validation was successful. It just loads the registerSuccessView.lc view.
command success
  get rigLoadView("registerSuccessView")
end success
Note: Add the handler name "success" to the global variable gControllerHandlers.
The emailCheck Handler
The last controller handler is an example of how to implement form validation callbacks, which permit you to extend the validation library to meet your needs.
# HANDLER CALLED BY THE CALLBACK RULE callback_emailCheck
command emailCheck pEmail
  if emailIsInDB(pEmail) then
    rigSetMessage "emailCheck", "The email has already been taken"
    return FALSE
  end if

  return TRUE
end emailCheck
The emailIsInDB(pEmail) function checks whether an entered email is already stored in the database. If so, an error message is displayed.
Later, we make sure that the model contains an emailIsInDB() function.
Note: Add the handler name "emailCheck" to the global variable gControllerHandlers.
The first line of the controller's code should now look like this:
put "asynRegister,index,email,password,passwordConfirm,signup,success,emailCheck" into gControllerHandlers
Validation Rules
The Form Validation library permits you to store all your validation rules organized in groups in a config file. You can organize these rules into "groups". These groups can be loaded automatically when a matching controller/handler is called.
To store the form validation rules, you need to create a file named validation.lc in the application/config folder if you don't have it already:
<?lc

local sValidationConf

# THIS FUNCTION IS MANDATORY
function rigFetchValidationConf
  return sValidationConf
end rigFetchValidationConf
Please note that you MUST add the rigFetchValidationConf() function to your configuration file as shown above.
Then add the validation rules as shown below:
rigAddValidationGrp "asynRegister"
rigAddValidationRules "email", "Email", "trim|requiredR|validEmailR|callback_emailCheck|xssClean", sValidationConf
rigAddValidationRules "password", "Password", "requiredR|minLengthR[8]|maxLengthR[24]", sValidationConf
rigAddValidationRules "passwordConfirm", "Confirm Password", "requiredR|matchesR[password]", sValidationConf
We set the name of the validation group to the name of the controller/handler, in this case, to the controller, because validation is done in the index handler that is executed by calling the controller. This means that we do not need to specify a validation group as a parameter of the rigFormValidRun() function.
The rules in detail are:
- email: "email" is the name of the field, "Email" is the name of the label, whitespace will be trimmed, the form element must not be empty, the value must be a valid email address, validation calls a callback controller handler named "emailCheck", and the value is run through the XSS filtering handler.
- password: "password" is the name of the field, "Password" is the name of the label, the form element must not be empty, the minimum length of the string must be 8 characters, the maximum 24 characters.
- passwordConfirm: "passwordConfirm" is the name of the field, "Confirm Password" is the name of the label, the form element must not be empty, and the value of this field must match the value of the password field.
All validation rules are stored in the sValidationConf variable.
Model
The model is responsible for database-related tasks. In this case, our model serves two purposes: It checks if the provided email address is already stored in the database and it stores email addresses and the corresponding passwords in the database.
As described above, the controller calls a model function named emailIsInDB() and a handler named insertUser. We will now build a model consisting of these two handlers.
We start with the basic prototype of a model script only stack:
script "asynregistermodel"


global gRigA


on libraryStack
  if (gRigA is not an array) and (the environment is "server") then
    put "No direct script access allowed."
    exit to top
  end if

  if the short name of the target <> the short name of me then
    pass libraryStack
  end if
end libraryStack


--| END OF asynregistermodel.livecodescript
--| Location:  ./application/models/asynregistermodel.livecodescript
----------------------------------------------------------------------
As specified in the asynRegister handler of the controller script, name this file "asynregistermodel.livecodescript" and save it in application/models.
The emailIsInDB Function
Add the following lines to build the emailIsInDB() function that is used to check if the provided email address is already stored in the database:
function emailIsInDB pEmail
  local tQueryResult

  rigDbWhere "email", pEmail
  put rigDbGet("users") into tQueryResult

  if tQueryResult["numrows"] > 0 then
    return TRUE
  end if

  return FALSE
end emailIsInDB
First, we set a WHERE clause to search for database entries in the "users" table that match the pEmail parameter. Then we run the query using the rigDbGet("users") function. If the query result contains data, i.e. the email address already exists in the database, the function returns "TRUE", otherwise "FALSE".
The insertUser Handler
Add the insertUser handler to the model script:
command insertUser pEmail pPassword
  local tDataA

  put pEmail into tDataA["email"]
  put pPassword into tDataA["password"]

  get rigDbInsert("users", tDataA)

  return it
end insertUser
This handler uses the rigDbInsert() function to insert an email address and a password into the "users" table of the database.
That's all about the model script, and all that is left to do is to build the view files.
View
To make views easy to manage, it’s a good idea to break out some common parts, like headers and footers, into their own view files, which can then be included in other views as needed. So, we split the registration page into three separate view files that will be loaded by a "main" view.
The Header View
Start with the header view and save the following code in application/views as registerHeaderView.lc:
<!DOCTYPE html>
<html lang="en" dir="ltr">
  <head>
    <meta charset="utf-8">
    <meta name="viewport" content="width=device-width, initial-scale=1.0">
This is just the doctype declaration and meta data. Now add the page title:
<title>[[gData["pageTitle"] ]]</title>
Remember: We stored the page title earlier, when we built the controller, in the global variable gData.
Add the stylesheet and complete the registerHeaderView.lc script:
    <? return rigCssAsset("asynReg.css") ?>
  </head>
  <body>
rigCssAsset() is an asset helper function, which generates a CSS asset location HTML code.
Your registerHeaderView.lc script should now look like this:
<!DOCTYPE html>
<html lang="en" dir="ltr">
  <head>
    <meta charset="utf-8">
    <meta name="viewport" content="width=device-width, initial-scale=1.0">

    <title>[[gData["pageTitle"] ]]</title>

    <? return rigCssAsset("asynReg.css") ?>
  </head>
  <body>
The Footer View
The footer includes the ASYNergy script.
Save the following code as "registerFooterView.lc" in application/views:
    <div id="footer">
      <hr>
      <p>revIgniter ASYNergy Form Validation Tutorial</p>

    </div>

    [[gData["asynergyScript"] ]]
  </body>
</html>
The Register View
The register view includes the registration form with form labels and paragraphs for error strings stored in the gData variable.
Save the following code in application/views as "registerView.lc":
<div class="container">

  [[gData["logo"] ]]

  <section class="main">
    [[gData["formOpen"] ]]
      <label for="email">Email Address</label>
      <input type="text" name="email" asyn:model.blur="email" asyn:transmit="email" value="[[gData["email"] ]]">
      [[gData["emailError"] ]]

      <label for="password">Password</label>
      <input type="password" name="password" asyn:model="password" asyn:transmit="password" value="[[gData["password"] ]]">
      [[gData["pwError"] ]]

      <label for="passwordConfirm">Confirm Password</label>
      <input type="password" name="passwordConfirm" asyn:model="passwordConfirm" asyn:transmit="passwordConfirm" value="[[gData["passwordConfirm"] ]]">
      [[gData["pwConfError"] ]]

      [[gData["submit"] ]]
    </form>

    <a href="#">Already have an account?</a>
  </section>

</div>
As you can see, all input elements have an asyn:model attribute. These ASYNergy directives act as triggers for AJAX requests. The corresponding asyn:mutable attributes we have previously added to the markup of the error messages, take a look at the index handler.
Please note that the asyn:model attribute of the "email" input field has a "blur" modifier. This causes an AJAX request to be sent when the input element loses focus.
All input elements have an asyn:transmit attribute. This means that the values of all these elements will be added to the request data when the user clicks on the submit button.
The Main View
Now save the code below as "registerMainView.lc" in application/views:
<?
put rigLoadView("registerHeaderView", TRUE) into tHeader
put rigLoadView("registerView", TRUE) into tContent
put rigLoadView("registerFooterView", TRUE) into tFooter

return tHeader && tContent && tFooter
?>
The main view, which is loaded by the index handler, combines the three partial views and returns the full registration page.
The Success View
There is one view left. It is the one which will be displayed after saving the form data to the database.
Save the following code in application/views as "registerSuccessView.lc":
<!DOCTYPE html>
<html lang="en" dir="ltr">
<head>
  <meta charset="utf-8">
  <meta name="viewport" content="width=device-width, initial-scale=1.0">

  <title>Registration Success</title>

</head>

<body>

  <div id="container">
    <header>
      <h1>Registration Success</h1>
    </header>

    <div id="main" role="main">
      [[gData["againAnchor"] ]]
    </div>

  </div>

</body>
</html>
That's it, your registration form should work as expected. Try it out, enter something in the form fields, and see the error messages that are triggered by AJAX requests. Save an email address and a password to the database, then try entering the same email address again.
Then deactivate JavaScript in your browser and you will see that form validation still works.
Conclusion
This sample illustrates:
- revIgniter's approach to form validation and real-time feedback when a form is filled out.
- By using revIgniter, you don't have to write a whole lot of LiveCode code as you don't have to write libraries from scratch.
- The combination of revIgniter and ASYNergy allows incremental updates to the user interface without reloading entire pages, making the application faster and more responsive to user actions.